Custom Ad Performance
Overview
This guide provides you with steps to perform a technical evaluation of using Keen APIs for custom ad performance tracking & measurement.
In this 20min technical evaluation, you will:
- Stream a custom-defined event to Keen using JavaScript
- Confirm the event was received
- Run a query on the event
- See how that query result can be embedded into reports and used programmatically
Skip straight to the technical evaluation.
The Case for Custom Ad Tracking
Custom ads, also sometimes referred to as native ads or direct ads, are ads sold directly rather than through an exchange. They’re popular with brands because they can provide a more noticeable, targeted, and powerful experience. They’re popular with publishers because they command a higher price.
Brands who invest in custom ad campaigns of course want to know how well their ads are performing.
As a baseline, a publisher displaying native ads will need to track and report impressions and engagements (table stakes are CPM, CPC, and CPA). But consider that as custom ads can become increasingly interactive, you may want to track more than just a click. Here are some examples of ad interactions (what we call Events) that you might consider tracking.
| Trackable Actions (Events) | Description |
|---|---|
| Impressions / Views | Tracked when an ad is loaded on the screen |
| Clicks | Tracked when an ad is clicked |
| Video Plays | Tracked when someone presses play or auto-play happens |
| Video Play depth | Tracked when someone makes it X% through the video ad |
| Hovers | Tracked when someone does a hover interaction |
| Form Submissions | Tracked when someone fills a form in the ad |
| Scrolls, Pans, Swipes, etc | Tracked when the engagement occurs with the ad |
| any custom action | Define your own interaction related to an ad |
| Acquisition (Lead, Purchase) | Downstream event received from the brand |
If you’re already investing in custom ad tracking, you might find that it’s also pretty easy to track rich audience information that’ll be highly valuable for your clients. These can be stored as properties on your JSON events. Here are some examples of audience properties that you can capture and present to your clients.
| Trackable Audience Properties | Description |
|---|---|
| uuid | “980asnc0a9nsd09nawoe90f9ane” |
| ip address | “173.245.198.24” (Tracked using Keen auto-enrichment) |
| location.city | “San Francisco” (Tracked using Keen IP to Geo) |
| location.state | “CA” (Tracked using Keen IP to Geo) |
| location.country | “United States” (Tracked using Keen IP to Geo) |
| device.family | “iPhone 6s” (Tracked using Keen user-agent parsing) |
| device.type | “mobile phone” (Tracked using Keen user-agent parsing) |
| browser.family | “iOS” (Tracked using Keen user-agent parsing) |
| session.id | “09ansd09n0wf9easdc999n2aa” |
| session.length | 38 (seconds) |
| session.articles_read | 2 |
| any custom property | (Define up to 1,000 unique properties) |
Of course, you’ll also need to know details about the ad unit that visitors are interacting with. Those are also stored as properties on your events. You can name the keys however you’d like. Here is a basic example.
| Ad Details | Description |
|---|---|
| ad.id | “88790” |
| ad.atfbtf | “ATF” |
| ad.location | “Article inline position 1” |
| ad.campaign | “Intelligent-Apps-Geo_US” |
| ad.content | “Intelligence-Apps-Images-Carousel-A” |
| ad.dimensions | “320 x 320” |
| any custom property | (Define up to 1,000 unique properties) |
In addition, you might also consider including properties about the content alongside which the ad was displayed. This can be handy for building trust with brands, and also help you identify which content nets the highest returns.
| Content Details | Description |
|---|---|
| site.domain | “mytimes.com” |
| site.title | “The Mew York Times” |
| article.title | “In the Golden Age of Data” |
| article.id | “9082039” |
| article.author | “Adelaide Wild” |
| article.url | “https://mytimes.com/in-the-age-of-data” |
| article.category | “Opinion” |
| any custom property | (Define up to 1,000 unique properties) |
Our job here at Keen is to make it easy for you to define the data model that works best for you, and have that data ready and available to query. The next section of this guide will explain how it all works, and how you can test it yourself.
20 Minute Self-Guided Technical Evaluation
- Stream a custom-defined event to Keen using JavaScript
- Confirm the event was received
- Run a query on the event
- See how that query result can be embedded into reports and used programmatically
Part 1: Stream an event
In this example, we’ll track an event using JavaScript, but you can post an event from any language, or use a pixel.
- Create an account and fill out the onboarding form. A new project will automatically be created.
- Click “Let’s Get Installed”
-
Select the JavaScript SDK and copy the code inside of the
scripttag. This bit of tracking code allows us to define any custom JSON event and send it to Keen.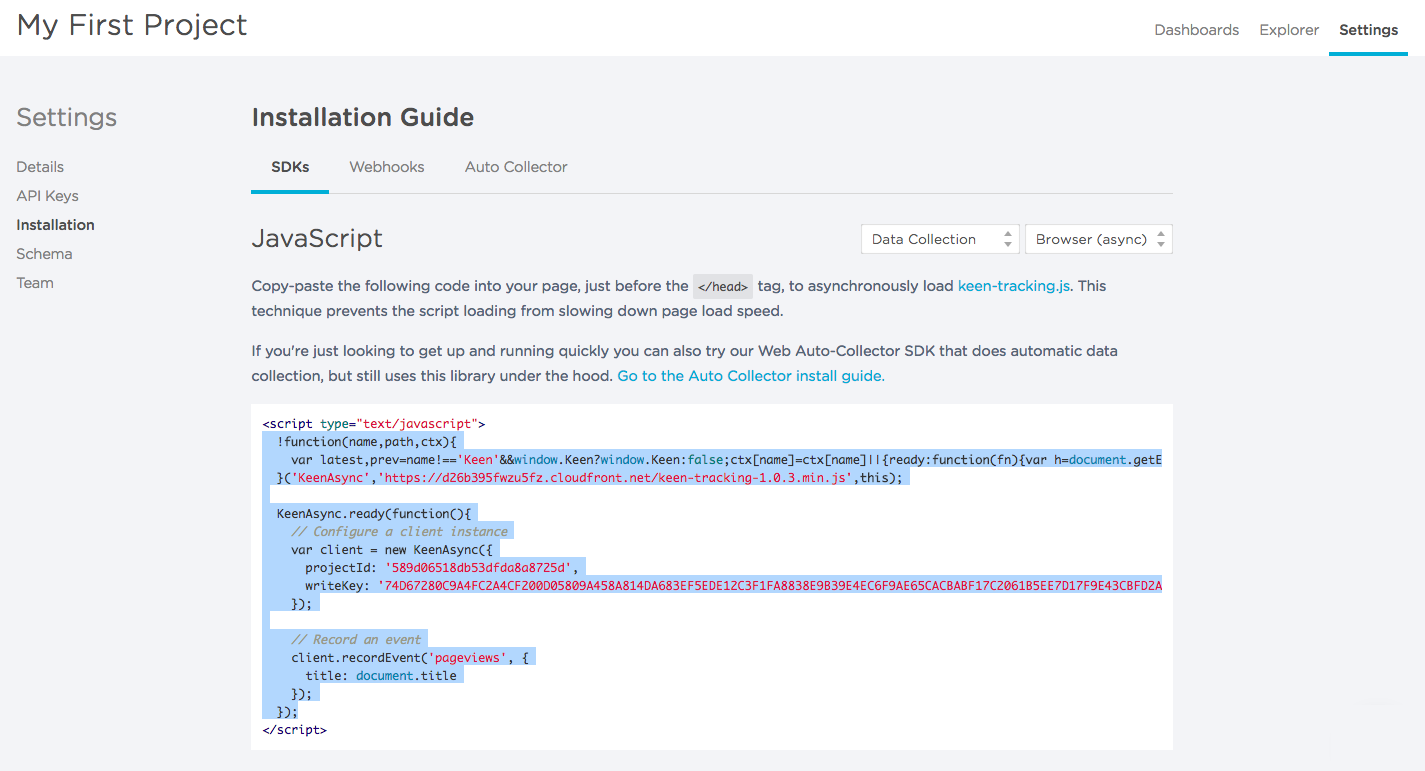
-
Jsfiddle is a handy tool for running and testing JavaScript. It’ll make it easy for us to run this test. Go to jsfiddle.net and paste the cope snippet into the script section.
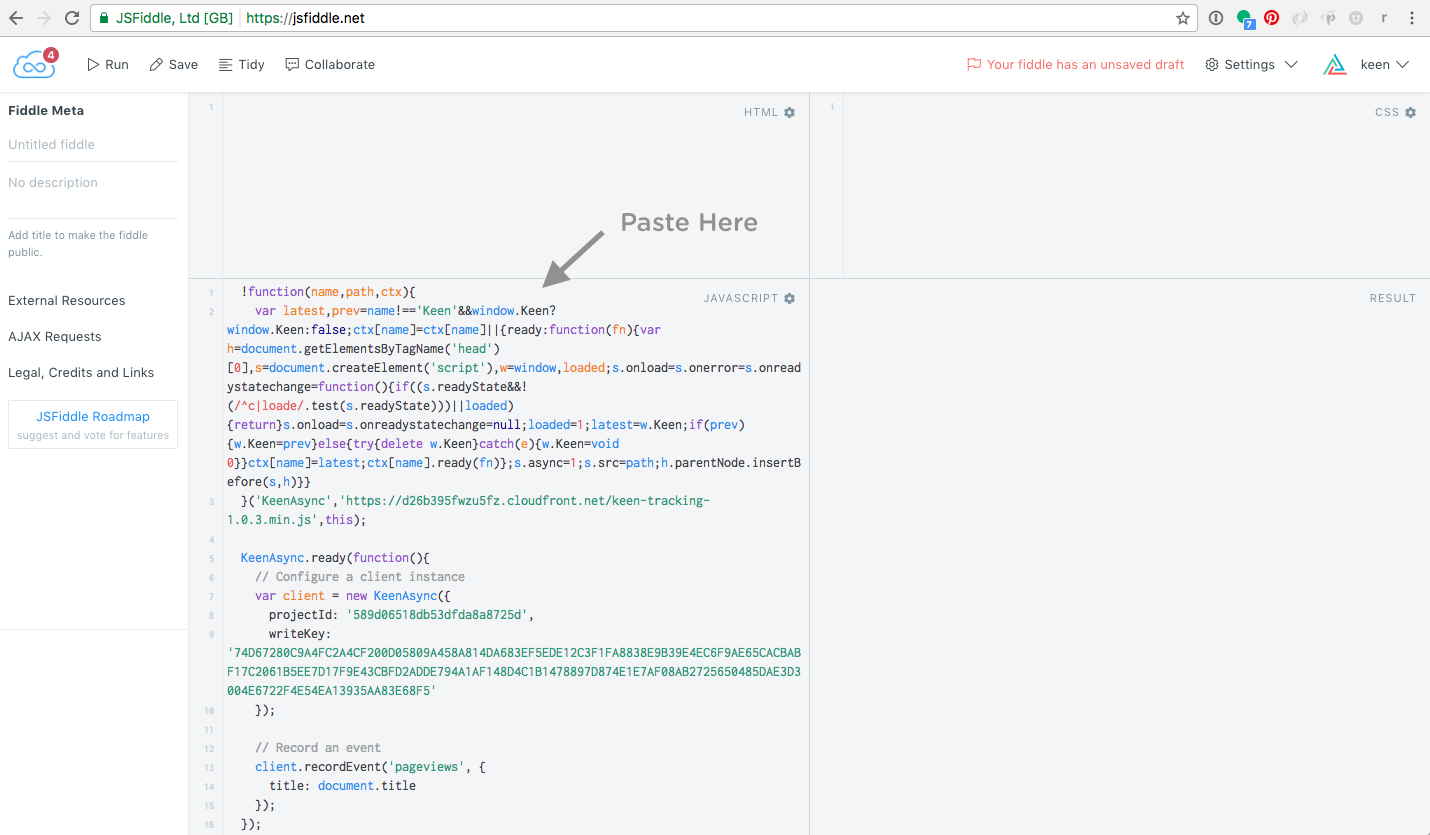
-
Now we have the option to define an event and send it off to be recorded. See where it says
pageviewsin the code sample? That’s the place where we specify the name of the event collection where we want to stream each type of event. Collections are created on-the-fly when you send your first event. Let’s change the name of the collection frompageviewstocustom_ad_engagements(or some more clever name of your choice).This example event that we copied contains just one property
title. Let’s modify it and add some custom properties. Below is an example of a much more detailed event, and you can imagine it being even more descriptive once you add in all the of example properties we discussed at the beginning of this guide.// Record an event client.recordEvent('custom_ad_engagements', { ad_interaction_type: "spin_carousel", ad : { campaign: "Intelligent-Apps-Geo_US", content: "Intelligent-Apps-Images-Carousel-A", id: "7783", client: "923" }, article : { author: "Adelaide Wild", category: "Technology", url: document.URL }, ip_address: "${keen.ip}", keen: { addons: [{ name: "keen:ip_to_geo", input: { ip: "ip_address" }, output: "ip_geo_info" }] } }); For this next part, you might want to open up your browser’s JavaScript console (View > Developer > JavaScript Console) to make sure all goes according to plan.
Press Run at the top in JSFiddle to execute the script, which should send the event. On the JavaScript Console network tab, you should see a GET request to api.keen.io which has a 200 response. If not, check for a missing comma or parenthesis in your code, and try again. If you get stuck, you can also reference my example working fiddle.
-
Let’s generate a few additional events so we have some test data to query. Press Run a few more times to send a few more events. Then, change one of the property values in your event to something new. For example, change the
ad.idfrom7783to7784. Press Run again a few more times.Note: In this example, we’re simply sending an event when this script runs. In production, you’ll configure your code to send whenever a user interaction occurs.
Part 2: Confirm the event was received
Let’s make sure our event successfully made it to Keen.
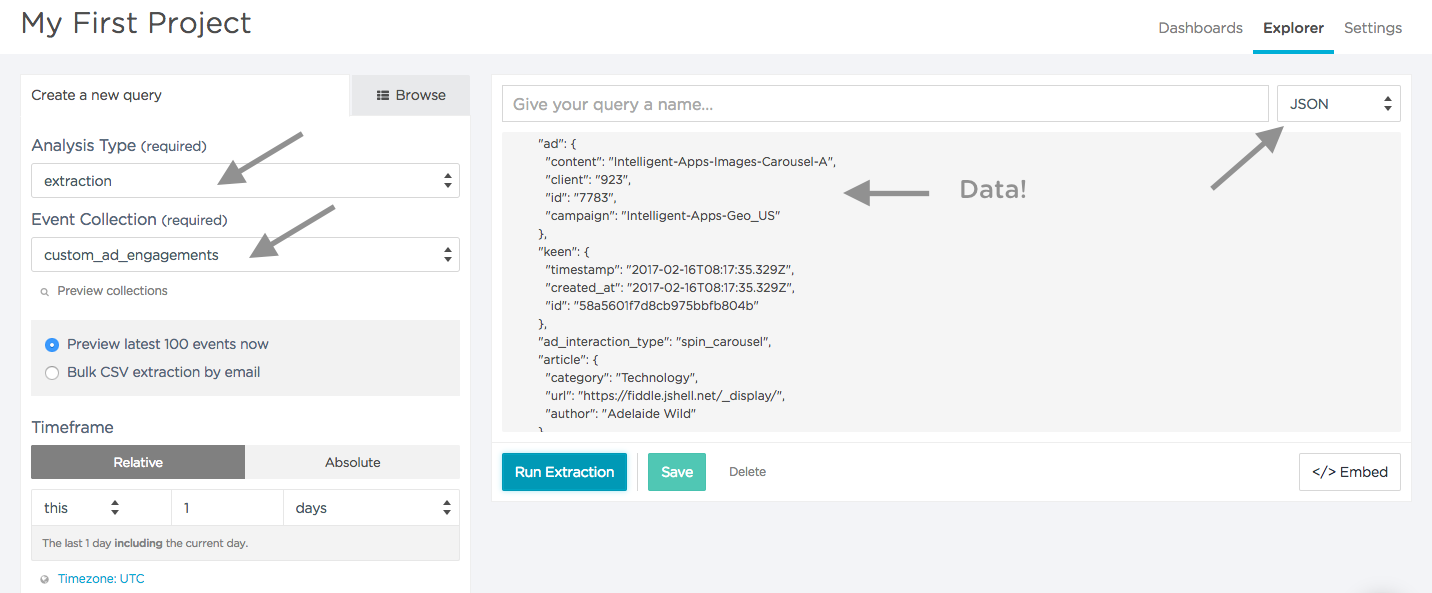
- Log into your Keen project and go to the Explorer.
- Select the
extractionAnalysis Type - Select your newly created Event Collection (e.g.
custom_ad_engagements) - Press Run Extraction
- On the upper right dropdown, Switch to JSON view to easily see the entire event
- Confirm the event is there and syntax looks like you intended
Part 3: Run a query on the event
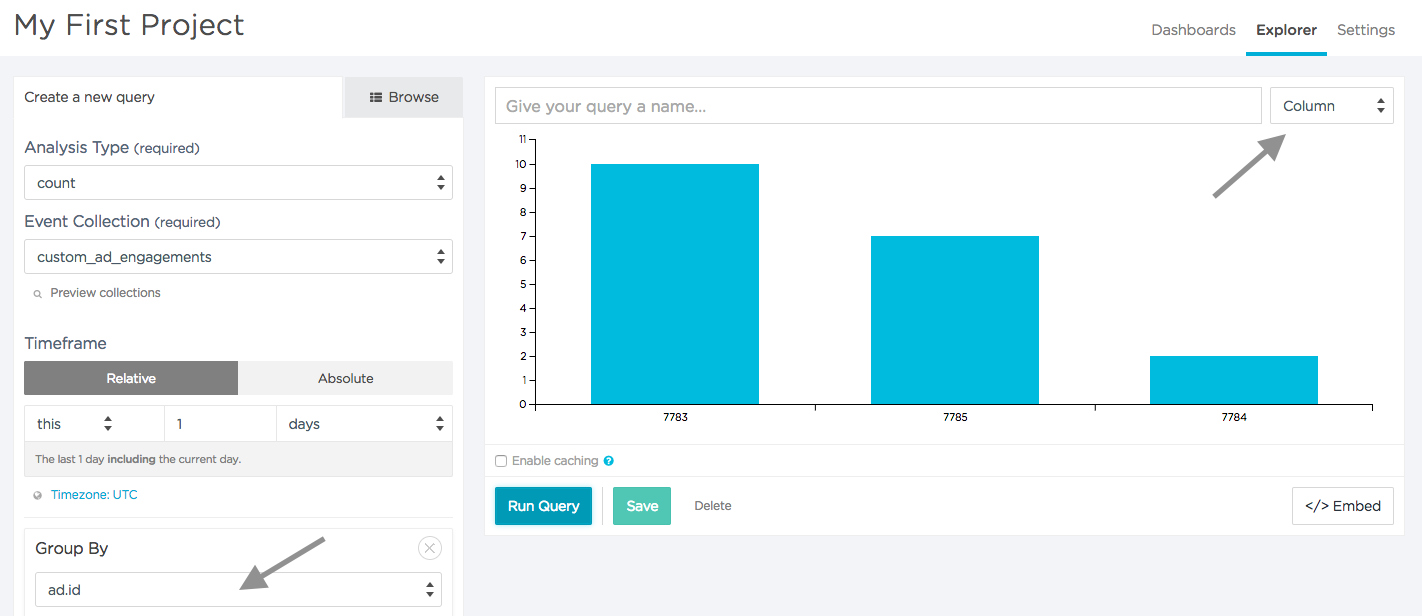
Now let’s try out some querying. Let’s imagine that you want to report back to your client how many user engagements they’ve been getting on their new ads.
- Switch to the
countAnalysis Type - Group_by
ad.idto count the engagements for all of the ads that exist in this dataset - Run the query to see the result.
Part 4: Embedding and programmatic querying
Finally, let’s imagine that you want to run this query programmatically, or embed it in an interface for your client.
Check out the Embed button in the lower right of the explorer. That’s an example of what querying Keen looks like using the JavaScript library. The same query that you built here in the explorer, you could also construct from anywhere else in your software. After getting the query result back, you can then use Keen’s viz functionality to draw a chart, use your own charting library, or do whatever you want with that data.
That’s just one example. Because all of Keen’s data is available via a secure REST API, you can query it from anything connected to the internet. That could be a site for your customer, a backend server where you’re doing programmatic decision-making, or a batch job where you’re generating reports or emails.
For more examples of how media companies use Keen, checkout Embedded Analytics and Publisher Analytics.
Got any questions? Interested in running a load test? Use the chat button in the bottom right to let us know.
